Tasty Red Velvet Cake Pops
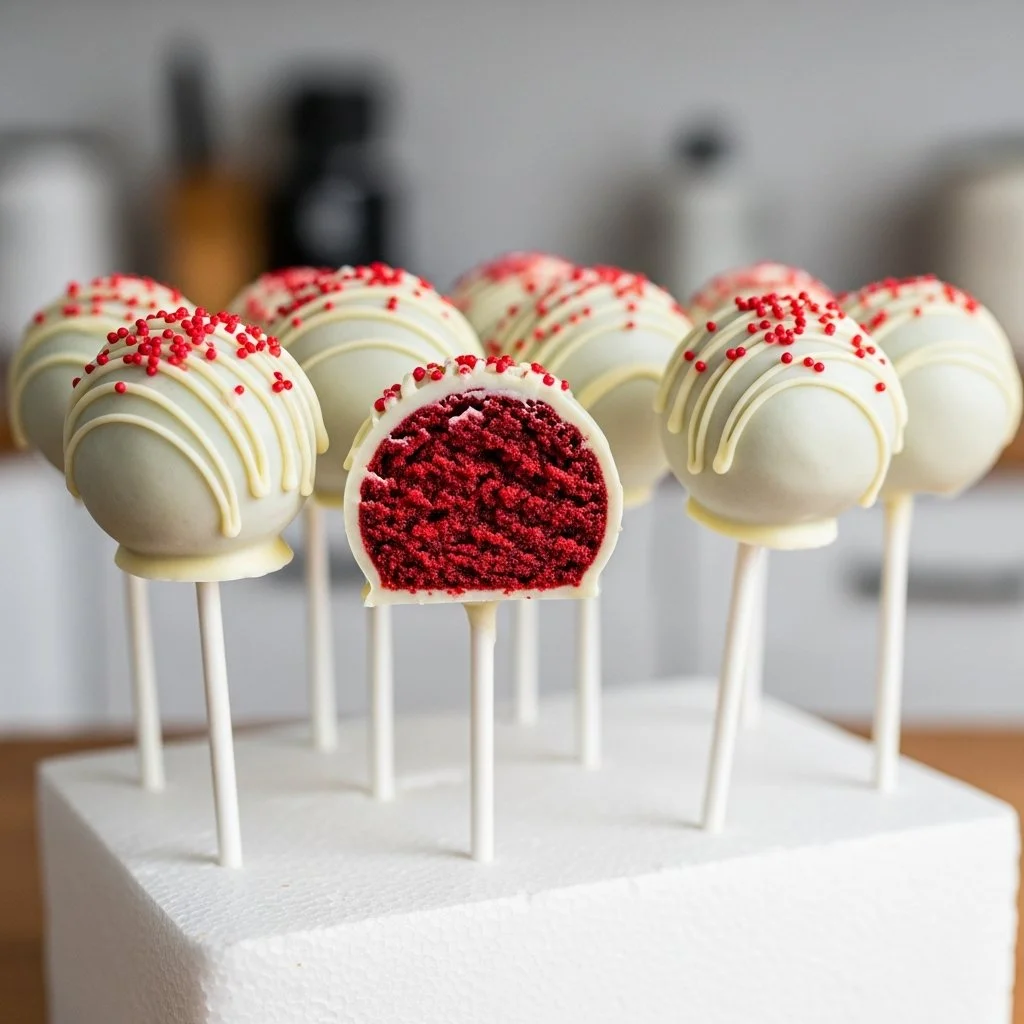
Tasty Red Velvet Cake Pops are an irresistible treat that combines the rich, velvety flavor of red velvet cake with the fun and portability of cake pops. Perfect for celebrations, parties, or just a sweet indulgence, these cake pops are sure to impress your family and friends. With a luscious cream cheese frosting and a smooth white chocolate coating, they look as delightful as they taste.
Recipe Information
- Prep Time: 30 minutes
- Cook Time: 0 minutes (requires baking time for the cake)
- Total Time: 30 minutes (plus time for baking the cake and setting the pops)
- Servings: 12 cake pops
- Difficulty Level: Easy
Nutrition Information
- Calories per serving: 150
- Protein: 2g
- Carbohydrates: 20g
- Fat: 7g
- Fiber: 0g
- Sugar: 10g
- Sodium: 110mg
Why Make This Tasty Red Velvet Cake Pops
Creating Tasty Red Velvet Cake Pops is a fantastic way to enjoy the classic flavors of red velvet cake in bite-sized pieces. They are visually stunning with their vibrant red color and white chocolate coating, making them perfect for special occasions like birthdays, weddings, or holidays. Cake pops are also a great way to use leftover cake, ensuring nothing goes to waste. Whether you’re a beginner in the kitchen or an experienced baker, this simple recipe allows everyone to experience the joy of making and sharing delicious treats.
How to Make Tasty Red Velvet Cake Pops
Making Tasty Red Velvet Cake Pops is a fun and creative process! Follow these steps to create your delightful treats.
Ingredients:
- 3 cups cooled and fully baked red velvet cake
- 1/2 cup frosting made with cream cheese
- 1 1/2 cups white chocolate or candy melts
- 2 tablespoons optional red velvet cake crumbs or sprinkles
Directions:
Step 1: Preparation
Crumble the cooled red velvet cake into a large bowl. Ensure there are no large chunks for better mixing.
Step 2: Mixing
Add the cream cheese frosting to the crumbled cake and mix until well combined. The mixture should be moist and hold together when pressed.
Step 3: Forming the Cake Pops
Roll the mixture into small balls, about the size of a tablespoon, and place them on a baking sheet lined with parchment paper.
Step 4: Freezing
Freeze the cake balls for about 30 minutes to firm up. This helps them maintain their shape when dipped in chocolate.
Step 5: Melting the Coating
Melt the white chocolate or candy melts in a microwave-safe bowl or a double boiler. Stir frequently until completely smooth and melted.
Step 6: Inserting Sticks
Dip the tips of lollipop sticks into the melted chocolate and insert them into the cake balls. This helps the sticks cling better to the cake pops.
Step 7: Dipping the Pops
Dip each cake pop into the melted chocolate, ensuring they are fully coated. Use a spoon to help cover the pops evenly.
Step 8: Adding Toppings
Sprinkle with optional red velvet crumbs or colorful sprinkles if desired, while the chocolate is still wet.
Step 9: Setting
Allow the pops to set in a styrofoam block or stand until the chocolate hardens completely. This may take about 15-20 minutes.
How to Serve Tasty Red Velvet Cake Pops
Serve these delightful cake pops on a decorative stand or in a jar for an enticing display. They make excellent party favors, or dessert treats for a special gathering. Enjoy them with a glass of milk or a cup of coffee for a well-rounded dessert experience.
How to Store Tasty Red Velvet Cake Pops
To store leftover cake pops, place them in an airtight container in the refrigerator for up to 5 days. Alternatively, they can be frozen for longer storage. Just wrap each pop tightly in plastic wrap before placing them in a freezer-safe bag or container. Thaw them in the fridge for a few hours before serving.
Expert Tips for Perfect Tasty Red Velvet Cake Pops
- Use a cookie scoop for uniform cake ball sizes.
- Make sure your red velvet cake is thoroughly cooled before crumbling; warm cake can become too mushy.
- Tapping the sticks gently after dipping helps shake off excess chocolate for a cleaner finish.
- If the chocolate hardens, simply reheat it to regain a dipping consistency.
- Experiment with different toppings like crushed nuts, shredded coconut, or edible glitter for a personalized touch.
Delicious Variations
- Dark Chocolate Coating: Instead of white chocolate, use dark chocolate for a richer flavor.
- Chocolate Cake Pops: Substitute red velvet with chocolate cake for a chocolate twist.
- Cake Pop Flavor Combos: Mix in some peanut butter or almond extract with the frosting for an added layer of flavor.
- Decorative Icing: Drizzle colored icing over the set cake pops for a festive touch.
Frequently Asked Questions
-
How do I know when my cake pops are fully set?
They will be firm and the chocolate coating will have hardened. Test a light touch with your fingertip. -
Can I use store-bought cake?
Absolutely! This recipe works great with any leftover cake or even store-bought cakes. -
How can I prevent the chocolate from cracking?
Ensure the cake pops are adequately chilled before dipping and avoid freezing them too long, which can cause temperature shock. -
What if my cake pop mixture is too dry?
Mix in a bit more cream cheese frosting until the desired consistency is reached. -
Can I make these ahead of time?
Yes! You can make them up to a week in advance and store them as mentioned above.
Conclusion
Tasty Red Velvet Cake Pops are not only a treat for the taste buds but also a feast for the eyes. Their rich flavor, impressive appearance, and versatility make them a wonderful addition to any celebration or a delightful snack for any day. So grab your ingredients and get started on this fun baking adventure—you’ll be glad you did! Enjoy making and sharing these delightful cake pops with your friends and family!
Print
Tasty Red Velvet Cake Pops
- Total Time: 30
- Yield: 12 cake pops 1x
- Diet: Vegetarian
Description
Irresistible red velvet cake pops coated with white chocolate and topped with optional sprinkles, perfect for any celebration.
Ingredients
- 3 cups cooled and fully baked red velvet cake
- 1/2 cup cream cheese frosting
- 1 1/2 cups white chocolate or candy melts
- 2 tablespoons optional red velvet cake crumbs or sprinkles
Instructions
- Crumble the cooled red velvet cake into a large bowl, ensuring there are no large chunks for better mixing.
- Add the cream cheese frosting to the crumbled cake and mix until well combined.
- Roll the mixture into small balls, about the size of a tablespoon, and place them on a baking sheet lined with parchment paper.
- Freeze the cake balls for about 30 minutes to firm up.
- Melt the white chocolate or candy melts in a microwave-safe bowl or double boiler until completely smooth.
- Dip each cake pop into the melted chocolate, ensuring they are fully coated.
- Sprinkle with optional red velvet crumbs or colorful sprinkles while the chocolate is still wet.
- Allow the pops to set in a styrofoam block or stand until the chocolate hardens completely, about 15-20 minutes.
<liDip the tips of lollipop sticks into the melted chocolate and insert them into the cake balls.
Notes
Use a cookie scoop for uniform sizes and keep the cake thoroughly cooled before crumbling.
- Prep Time: 30
- Category: Dessert
- Method: Freezing
- Cuisine: American
Nutrition
- Serving Size: 1 pop
- Calories: 150
- Sugar: 10g
- Sodium: 110mg
- Fat: 7g
- Saturated Fat: 4g
- Unsaturated Fat: 2g
- Trans Fat: 0g
- Carbohydrates: 20g
- Fiber: 0g
- Protein: 2g
- Cholesterol: 0mg