No-Bake Cherry Cheesecake
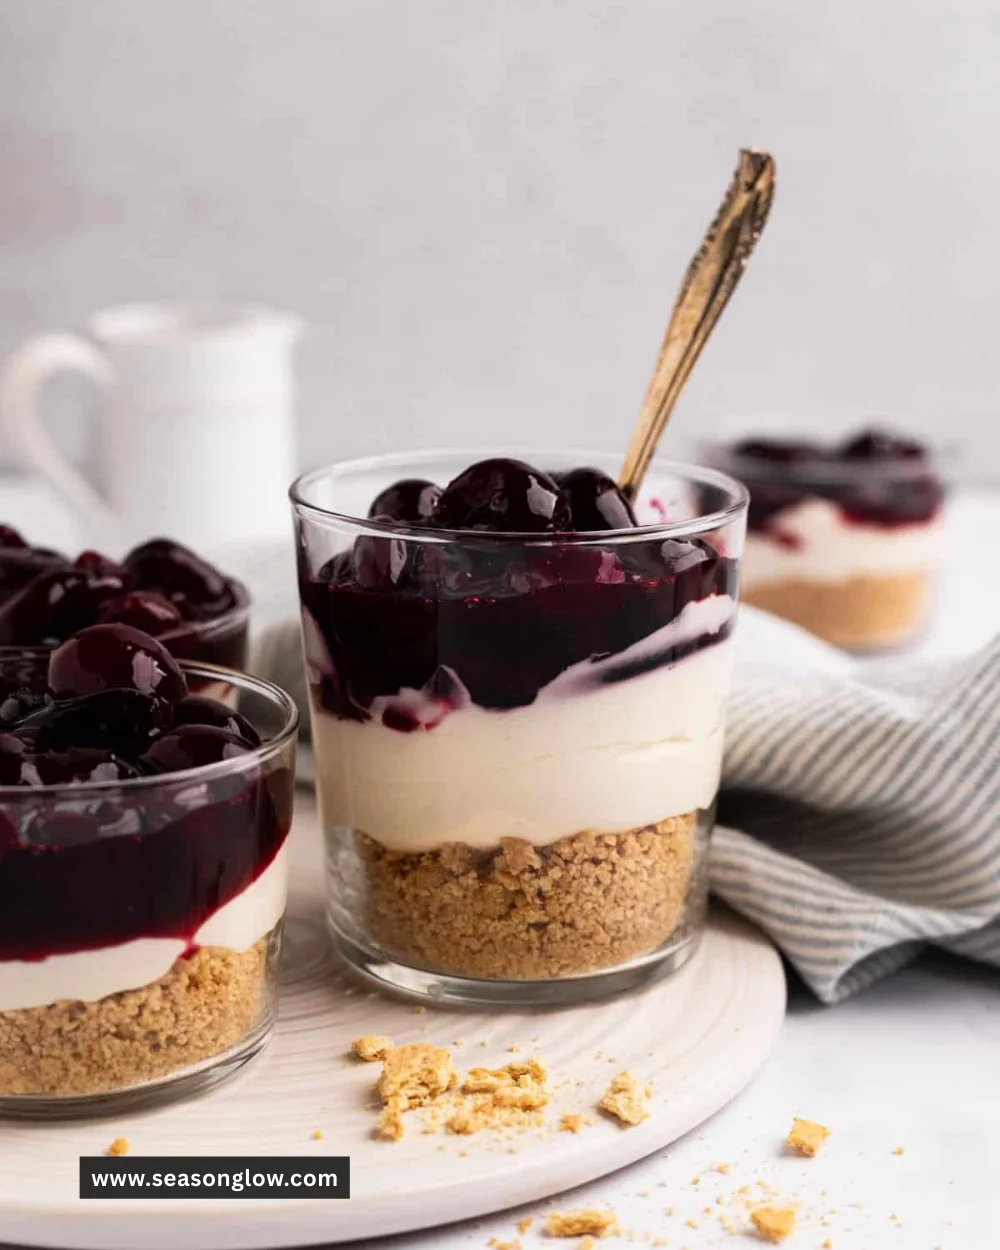
When I think of summer gatherings with family and friends, one dessert always stands out in my memory: the No-Bake Cherry Cheesecake. It’s not just the taste that makes it special; it’s the joy of sharing a slice, relishing the moment with loved ones, and the nostalgia of those laughter-filled afternoons. Each bite is a delightful blend of creamy cheesecake, buttery graham cracker crust, and the sweet tanginess of cherry topping. It’s like a burst of sunshine on your palate.
Recipe Timing
- Prep Duration: 20 minutes
- Active Cooking: 10 minutes
- Total Duration: 4 hours 20 minutes (including setting time)
- Portion Size: 8 servings
- Complexity: Simple
Nutritional Recipe
- Calories per portion: Approximately 350
- Protein: 4 grams
- Carbs: 40 grams
- Fats: 22 grams
- Fiber: 1 gram
- Sugars: 24 grams
- Sodium: 220 mg
Why You’ll Love This No-Bake Cherry Cheesecake
There’s something magical about a no-bake cheesecake. It’s light, fluffy, and so much easier to prepare than its baked counterparts. This No-Bake Cherry Cheesecake is perfect for warm weather when you don’t want to turn on the oven, but still crave something sweet and satisfying. Its creamy filling pairs beautifully with the bright cherry topping, making it a crowd-pleaser at parties or simply as a treat for yourself after a long day. Plus, it’s made with love and incredibly easy to whip up—perfect for both novice and experienced bakers alike!
The Complete Cooking Journey
Ingredients
- 1 1/2 cups graham cracker crumbs
- 1/2 cup unsalted butter, melted
- 2 (8 oz) packages cream cheese, softened
- 1 cup powdered sugar
- 1 teaspoon vanilla extract
- 1 cup heavy whipping cream
- 1 can (21 oz) cherry pie filling
Method
Step 1: Prepare the Crust
In a medium bowl, combine graham cracker crumbs and melted butter. Press the mixture into the bottom of a 9-inch springform pan to form the crust.
Step 2: Mix the Cheesecake Base
In a large bowl, beat together the softened cream cheese, powdered sugar, and vanilla extract until smooth, creating a luscious cheesecake filling.
Step 3: Whip the Cream
In another bowl, whip the heavy cream until stiff peaks form. This will give your cheesecake a light, airy texture.
Step 4: Combine the Mixtures
Gently fold the whipped cream into the cream cheese mixture until fully combined. This careful combining helps maintain the lightness of the whipped cream.
Step 5: Assemble the Cheesecake
Pour the cream cheese filling over the crust and smooth the top with a spatula, ensuring an even layer.
Step 6: Chill to Perfection
Refrigerate for at least 4 hours or until set. This step allows the flavors to meld beautifully and the filling to firm up.
Step 7: Top and Serve
Before serving, top with the cherry pie filling. Slice, serve, and enjoy this delightful dessert!
Serving Suggestions & Pairings
This No-Bake Cherry Cheesecake is fantastic served on its own, but serving it with a dollop of freshly whipped cream or a sprinkle of chocolate shavings can take it to another level. Pair it with a refreshing iced tea or a light rosé wine to enhance the summer vibes at your next gathering.
Storage & Leftovers Guide
If you manage to have leftovers (which is rare!), this cheesecake can be covered and stored in the refrigerator for about 3 to 5 days. Just make sure to keep it tightly sealed to retain its freshness.
Kitchen Wisdom & Success Tips
- Room Temperature Ingredients: Make sure your cream cheese is at room temperature for easy mixing and a smoother filling.
- Graham Crackers: You can use store-bought graham cracker crumbs or crush whole graham crackers in a food processor.
- Pan Choice: Using a springform pan makes it easy to remove the cheesecake without damaging the crust.
- Flavor Boost: For an extra layer of flavor, consider adding lemon zest or almond extract to the cream cheese mixture.
Flavor Variations & Adaptations
Feel free to customize this cheesecake to suit your taste! You can use different fruit toppings like blueberries, strawberries, or even a mix. For a chocolate twist, swirl in some melted chocolate into the filling, or use chocolate cookies instead of graham crackers for the crust.
Reader Questions & Solutions
-
Can I use light cream cheese?
Yes, light cream cheese works, but the texture might be slightly different. -
What if I don’t have a springform pan?
You can use a regular pie dish, just be careful when slicing to serve. -
Can I make this ahead of time?
Absolutely! This cheesecake stores well in the fridge for several days. -
Why did my cheesecake not set?
Ensure you’re refrigerating it long enough and use heavy whipping cream for proper whipping. -
Can I freeze this cheesecake?
Yes, you can freeze it! Just wrap tightly and consume within a month for best quality.
Wrapping Up
As you take a slice of this No-Bake Cherry Cheesecake, let the flavors transport you to sunny days filled with laughter and love. Cooking should be about connection, enjoyment, and a little bit of indulgence, and this recipe embodies all of that. So gather your ingredients, embrace the simplicity of this luscious dessert, and bask in the joy it brings to your table. Happy baking!
Print
No-Bake Cherry Cheesecake
- Total Time: 260 minutes
- Yield: 8 servings 1x
- Diet: Vegetarian
Description
A delightful no-bake cherry cheesecake with a creamy filling and buttery graham cracker crust, perfect for summer gatherings.
Ingredients
- 1 1/2 cups graham cracker crumbs
- 1/2 cup unsalted butter, melted
- 2 (8 oz) packages cream cheese, softened
- 1 cup powdered sugar
- 1 teaspoon vanilla extract
- 1 cup heavy whipping cream
- 1 can (21 oz) cherry pie filling
Instructions
- In a medium bowl, combine graham cracker crumbs and melted butter. Press the mixture into the bottom of a 9-inch springform pan to form the crust.
- In a large bowl, beat together the softened cream cheese, powdered sugar, and vanilla extract until smooth.
- In another bowl, whip the heavy cream until stiff peaks form.
- Gently fold the whipped cream into the cream cheese mixture until fully combined.
- Pour the cream cheese filling over the crust and smooth the top with a spatula.
- Refrigerate for at least 4 hours or until set.
- Before serving, top with the cherry pie filling. Slice, serve, and enjoy!
Notes
Ensure cream cheese is at room temperature for easy mixing. Use a springform pan for easy removal and consider adding lemon zest for extra flavor.
- Prep Time: 20 minutes
- Cook Time: 10 minutes
- Category: Dessert
- Method: No-Bake
- Cuisine: American
Nutrition
- Serving Size: 1 slice
- Calories: 350
- Sugar: 24g
- Sodium: 220mg
- Fat: 22g
- Saturated Fat: 14g
- Unsaturated Fat: 8g
- Trans Fat: 0g
- Carbohydrates: 40g
- Fiber: 1g
- Protein: 4g
- Cholesterol: 60mg