Ninja Foodi Bacon
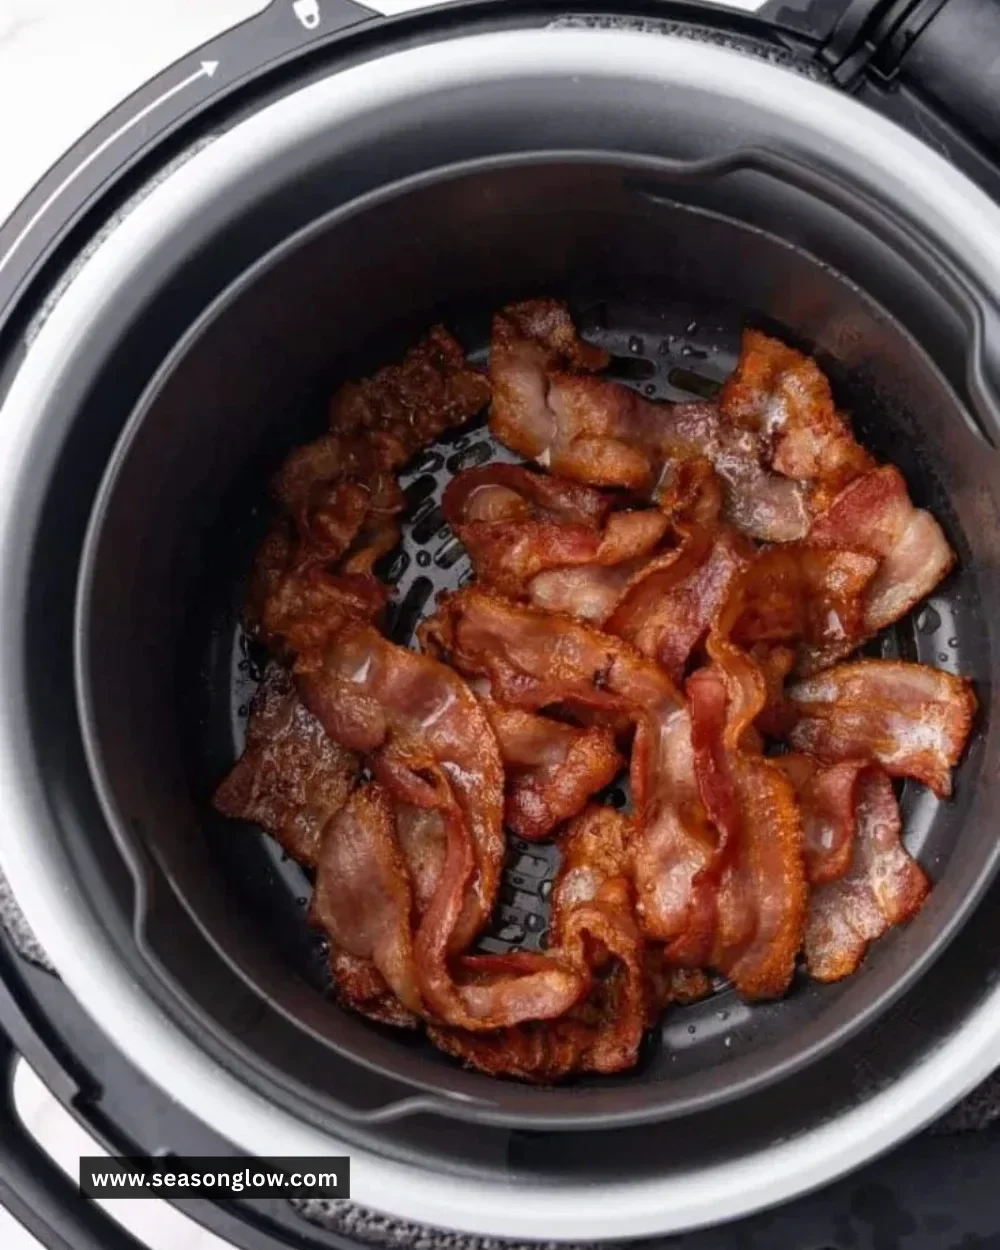
Ninja Foodi Bacon is a game-changer when it comes to crispy and delicious bacon without the mess. Using the Ninja Foodi allows for a perfectly cooked bacon that retains that satisfying crunch, making it a fantastic addition to breakfast plates, sandwiches, and even salads. Ready to elevate your bacon game? Let’s dive into everything you need to know about making Ninja Foodi Bacon!
Recipe Information
- Prep Time: 5 minutes
- Cook Time: 15 minutes
- Total Time: 20 minutes
- Servings: 4
- Difficulty Level: Easy
Nutrition Information
- Calories per serving: 200
- Protein: 17 grams
- Carbohydrates: 0 grams
- Fat: 16 grams
- Fiber: 0 grams
- Sugar: 0 grams
- Sodium: 450 mg
Why Make This Ninja Foodi Bacon
Using the Ninja Foodi to cook bacon brings out the best in this cherished ingredient. The air-crisping technique ensures even cooking and crisper edges, while the added water keeps the bacon from splattering all over your kitchen. In just minutes, you can have perfectly cooked bacon that’s flavorful and wonderfully crispy. Plus, it’s a hands-off method that allows you to multitask in the kitchen!
How to Make Ninja Foodi Bacon
## Ingredients:
- Bacon
- Water
## Directions:
### Step 1: Preparation
Place the rack or basket of the Ninja Foodi inside. This sets up the cooking area where your bacon will achieve that perfect crispiness.
### Step 2: Adding Bacon
Add the bacon strips to the rack or basket, ensuring they are not crowded. Spacing them out allows hot air to circulate and cook each slice evenly.
### Step 3: Adding Water
Add a small amount of water to the pot (about 1/4 cup) to prevent splattering. This step is key in keeping your cooking area tidy while enhancing the sizzling sound of bacon cooking.
### Step 4: Cooking
Close the lid and select the ‘Air Crisp’ function. Set the temperature to 400°F and cook for about 10-15 minutes, checking for crispiness at the 10-minute mark. This is where the magic happens—watch as the bacon transforms into crispy perfection!
### Step 5: Finishing
Once done, carefully remove the bacon and allow it to drain on paper towels before serving. This step helps to absorb any excess grease, leaving you with beautifully crispy strips.
How to Serve Ninja Foodi Bacon
Ninja Foodi Bacon can be served in a variety of delicious ways. It’s perfect on a breakfast plate alongside eggs and toast, in a classic BLT sandwich, or crumbled over a fresh salad for added crunch. You can also use it in recipes like baked beans or wrapped around asparagus for a wonderful appetizer!
How to Store Ninja Foodi Bacon
To store leftover bacon, let it cool completely, then place it in an airtight container in the refrigerator. Properly stored, it should last for about 3 to 4 days. You can also freeze strips of bacon individually for up to a month; just ensure they’re well-wrapped to prevent freezer burn.
Expert Tips for Perfect Ninja Foodi Bacon
- Experiment with different types of bacon, such as thick-cut or flavored varieties. Each will bring its own texture and flavor.
- Keep an eye on the bacon during the last few minutes of cooking to achieve your desired level of crispiness.
- Clean the Ninja Foodi soon after cooking to make the next bacon-making session even easier.
Delicious Variations
- Maple-glazed bacon: Brush cooked bacon with maple syrup and return to the Ninja Foodi for a sweet finish.
- Spicy bacon: Sprinkle bacon with cayenne pepper or crushed red pepper flakes before cooking for a spicy kick.
- Herbed bacon: Add dried herbs like rosemary or thyme to the bacon strips prior to cooking for an aromatic touch.
Frequently Asked Questions
-
What’s the best type of bacon to use?
Any type of bacon works well, but thick-cut bacon often yields the crispiest results. -
Can I cook other foods in the Ninja Foodi at the same time?
Yes! Just ensure that the other foods can cook at the same temperature and required time as the bacon. -
How do I prevent bacon from curling?
Using a rack can help keep bacon flat while it cooks. Avoid overcrowding the strips for the best results. -
Is it safe to use the Ninja Foodi for cooking bacon?
Absolutely! The Ninja Foodi is designed to handle high-fat foods like bacon, making it a safe and effective cooking option. -
How do I reheat leftover bacon?
Reheat bacon in the Ninja Foodi using the ‘Air Crisp’ function at 350°F for just a few minutes until warm and crispy.
Conclusion
Ninja Foodi Bacon is not only easy to prepare, but it’s also a satisfying treat that can elevate countless meals. Whether enjoyed at breakfast, as a topping, or as a snack, this recipe ensures you’ll always have crispy, flavorful bacon ready to go. So go ahead, fire up your Ninja Foodi and indulge in the delightful crunch and savory flavor of this beloved breakfast staple! Happy cooking!
Print
Ninja Foodi Bacon
- Total Time: 20 minutes
- Yield: 4 servings
- Diet: Paleo
Description
Make perfectly crispy bacon using the Ninja Foodi with minimal mess and hassle. Ideal for breakfast, sandwiches, or salads.
Ingredients
- Bacon
- Water (about 1/4 cup)
Instructions
- Place the rack or basket inside the Ninja Foodi.
- Add the bacon strips to the rack or basket, spacing them out.
- Pour a small amount of water into the pot to prevent splattering.
- Close the lid and select the ‘Air Crisp’ function, setting the temperature to 400°F. Cook for about 10-15 minutes, checking for crispiness at the 10-minute mark.
- Once done, carefully remove the bacon and drain on paper towels before serving.
Notes
Experiment with different types of bacon for various textures and flavors. Store leftover bacon in an airtight container in the refrigerator for 3 to 4 days. You can also freeze bacon strips individually.
- Prep Time: 5 minutes
- Cook Time: 15 minutes
- Category: Breakfast
- Method: Air Frying
- Cuisine: American
Nutrition
- Serving Size: 1 serving
- Calories: 200
- Sugar: 0g
- Sodium: 450mg
- Fat: 16g
- Saturated Fat: 5g
- Unsaturated Fat: 11g
- Trans Fat: 0g
- Carbohydrates: 0g
- Fiber: 0g
- Protein: 17g
- Cholesterol: 40mg